기본 환경: IDE: VS code, Language: Python
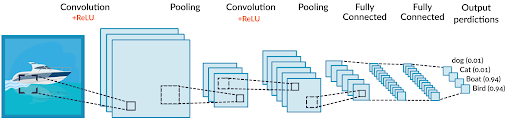
Sequence data(음성인식이라던지 자연어라던지 등의 문맥이 있는 데이터)의 경우, 이전의 단어들을 이해해야 전체의 맥락을 이해 할 수 있으나 맥락들이 있는 series 데이터는 이전 상태를 전달하지 않는 DNN/CNN에서 사용하기 어려움
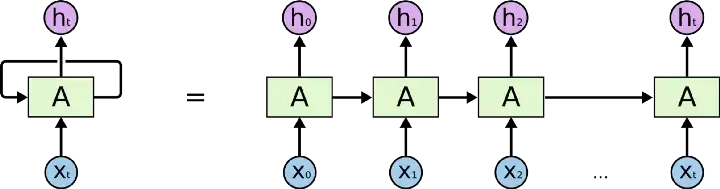
⭐ RNN은 상태(state)를 계산할때는 이전 상태(state)를 사용하여, 이전 연산값이 bias처럼 영향을 미치면서 미래의 predict에 영향을 미침
RNN 작동원리
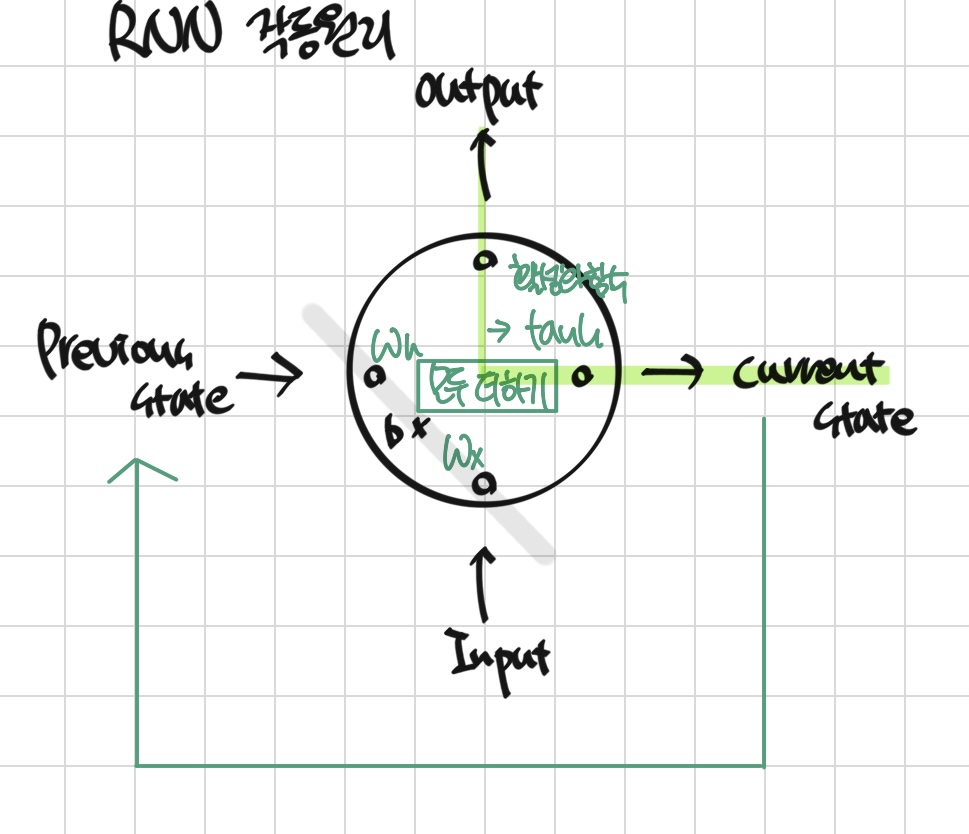
RNN 작동원리 활용 예제
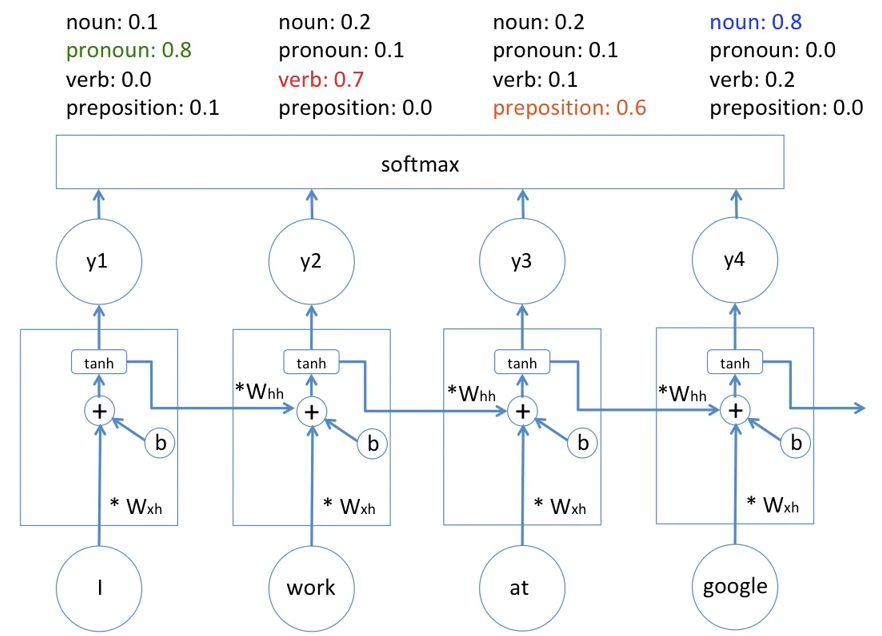
1. I가 ProNoun일 확률이 높다는 것을 다음 layer에 전달
2. 이전 값이 ProNoun일 확률이 높으므로 work는 동사일 확률이 높다는 것이 work에 품사 결정에 영향
... 의 반복
⚠️ RNN의 경우, 장기 의존성(Longterm Dependency) 문제 발생
LSTM(Long Short Term Memory)
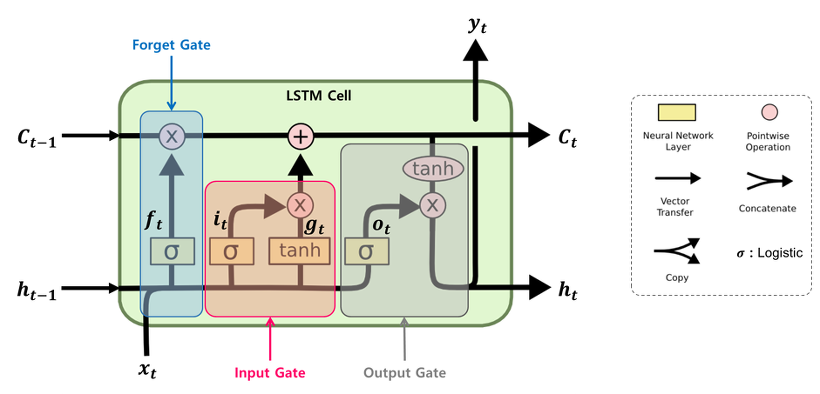
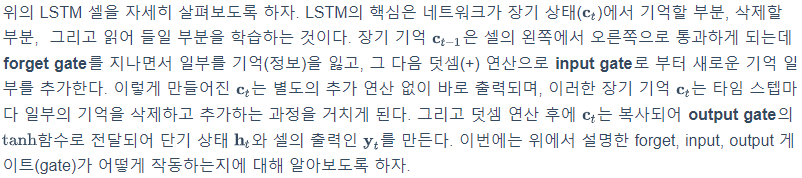
1. 삭제 게이트(forget gate)
: 장기 상태의 어느 부분이 삭제되어야 하는지 제어하는 역할
: Activatoin Function: Sigmoid
: 결과값이 0에 가까울수록 정보가 많이 삭제된 것이고, 1에 가까울수록 온전한 상태에 가까운 것
2. 입력 게이트(input gate)
: 장기 상태의 어느 부분이 기억되어야 하는지 제어하는 역할
: Activation Function: Sigmoid, Tanh
3. 셀 상태(장기 상태)
C(t-1) -> C(t): 삭제 게이트와 입력 게이트를 거쳐서 만들어지는 셀
-> 삭제 게이트: 이전 시점의 입력을 얼마나 반영할지 제어
-> 입력 게이트: 현재 시점의 입력을 얼마나 반영할지 제어
4. 출력 게이트와 은닉 상태(단기 상태)
: 장기 상태의 어느 부분을 읽어서 현재 시점의 어떤 값으로 출력해야하는지 제어
⭐ SimpleRNN보다 gate가 4배이므로 연산량도 4배
GRU(Gated Recurrent Units)
: LSTM을 기반으로 만들어진 모델로 더 간략한 구조를 통해 비슷한 성능에 빠른 속도를 구현
: 업데이트 게이트와 리셋 게이트 두 가지 게이트만이 존재
1. Reset Gate
: 과거의 정보를 적당히 reset 시키는 목적
2. Update Gate
: 과거와 현재 정보의 최신화 비율을 결정
3. Candidate
: 현 시점의 정보 후보군을 계산
⭐ SimpleRNN보다 gate가 3배이므로 연산량도 3배였으나, version update로 인해서 연산량 변경
⭐ Model Summary(RNN, LSTM, GRU)
# calc_param_RNN_LSTM_GRU.py

import numpy as np

from tensorflow.keras.models import Sequential
from tensorflow.keras.layers import Dense, SimpleRNN, LSTM, GRU, Dropout


# 1. Data
dataset=np.array([1,2,3,4,5,6,7,8,9,10]) # (10,)
# absence y data

# make a y data
x = np.array([[1,2,3],
              [2,3,4],
              [3,4,5],
              [4,5,6],
              [5,6,7],
              [6,7,8],
              [7,8,9]]) # (7, 3)
y = np.array([4,5,6,7,8,9,10]) # (7,)
# y = np.array([[4],[5],[6],[7],[8],[9],[10]]) 과 동일

x = x.reshape(7,3,1)


# 2. Model Construction
model = Sequential()
# model.add(SimpleRNN(units=64, input_length=3, input_dim=1))
# model.add(LSTM(units=10, input_shape=(3,1)))
model.add(GRU(units=10, input_shape=(3,1)))
model.add(Dense(1))
model.summary()
'''
Model: "sequential"
_________________________________________________________________
 Layer (type)                Output Shape              Param #
=================================================================
 simple_rnn (SimpleRNN)      (None, 10)                120
-----------------------------------------------------------------
 lstm (LSTM)                 (None, 10)                480
-----------------------------------------------------------------
 gru (GRU)                   (None, 10)                390
_________________________________________________________________

SimpleRNN Param #
Total params = recurrent_weights + input_weights + biases
= (units*units)+(features*units) + (1*units)
= units(units + feature + 1)


LSTM Param #
Params # = 4 * (output_dim(output_dim + input_dim + 1))
= 4 * SimpleRNN (gate가 4개라서 SimpleRNN의 4배)


(Deprecated) GRU Param #
Params # = 3 * ((input_dim + 1) * output_dim + output_dim^2)
= 3 * SimpleRNN (gate가 3개라서 SimpleRNN의 3배)


(Renew) GRU Param #
Params # = 3 * output_dim * (input_dim + bias + reset_after bias + output_dim)
(reset_after=False: 3 * output_dim * (input_dim + bias + output_dim))
-> 3 * 10 * (1 + 1 + 1 + 10)
(Default: reset_after=True)

'''
➕ data 생성 후, 다양한 모델에 적용하기
# split_x_with_application_model.py

import numpy as np

from tensorflow.keras.models import Sequential
from tensorflow.keras.layers import Dense, SimpleRNN, LSTM, GRU, Conv2D, Flatten, Dropout


# Prepare Total data
a = np.array(range(1,11)) # 1~10
timesteps = 5

def split_x(dataset, timesteps):
    li = [] # 빈 list 생성
    for i in range(len(dataset) - timesteps + 1):
        # for i in range(3->range(3): 0, 1, 2), range(4->2), range(5->1) : 반환하는 리스트 개수
        subset = dataset[i: (i+timesteps)]
        # dataset[0(이상):3(미만)] [1:4] [2:5]: dataset 위치에 있는 값 반환
        li.append(subset) # append: 추가
    return np.array(li)
'''
timesteps = 5
[[1 2 3 4 5]]

timesteps = 4
[[1 2 3 4]
 [2 3 4 5]]

 timesteps = 3
 [[1 2 3]
 [2 3 4]
 [3 4 5]]
'''

total_Data = split_x(a, timesteps)
print(total_Data)
'''
[[ 1  2  3  4  5]
 [ 2  3  4  5  6]
 [ 3  4  5  6  7]
 [ 4  5  6  7  8]
 [ 5  6  7  8  9]
 [ 6  7  8  9 10]]
'''
print(total_Data.shape) # (6, 5)

# 1-2. make x, y data
x = total_Data[:, :-1] # 모든 행, 시작 ~ -2번째 열
y = total_Data[:, -1] # 모든 행, -1번째 열(시작: 0번째 열)

print(x, y)
'''
x:
[[1 2 3 4]
 [2 3 4 5]
 [3 4 5 6]
 [4 5 6 7]
 [5 6 7 8]
 [6 7 8 9]]

 y:
 [ 5  6  7  8  9 10]
= [5][6][7][8][9][10]

'''


# RNN
x=x.reshape(6,4,1)
# LSTM input_shape=3

model1 = Sequential()
model1.add(LSTM(units=64, input_shape=(4,1)))
# model.add(SimpleRNN(units=64, input_shape=(4,1)))
# model.add(GRU(units=64, input_shape=(4,1)))
model1.add(Dense(32, activation='relu'))
model1.add(Dropout(0.2))
model1.add(Dense(16, activation='relu'))
model1.add(Dropout(0.1))
model1.add(Dense(16, activation='relu'))
model1.add(Dense(1))
model1.summary()

'''
cf.
x = x.reshape(96,2,2)
# data feature가 홀수일 때는 reshape이 불가능하므로, 처음부터 data set을 짝수로 구비하기

model.add(LSTM(units=64, input_shape=(2,2)))
# reshape 시, timesteps*feature가 유지되도록 reshape
'''


# DNN
# Dense input_shape=2이상

model2 = Sequential()
model2.add(Dense(32, activation='relu', input_shape=(4,)))
model2.add(Dense(16, activation='relu'))
model2.add(Dense(16, activation='relu'))
model2.add(Dense(4, activation='relu'))
model2.add(Dense(1))


# Cov2D
x = x.reshape(96,2,2,1)
# Conv2D input_shape=4

model3 = Sequential()
model3.add(Conv2D(32, (2,2), padding='same', activation='relu', input_shape=(2,2,1)))
model3.add(Flatten())
model3.add(Dense(16, activation='relu'))
model3.add(Dense(16, activation='relu'))
model3.add(Dense(4, activation='relu'))
model3.add(Dense(1))
⭐ RNN Model Construction
# rnn_model.py

import numpy as np

from tensorflow.keras.models import Sequential
from tensorflow.keras.layers import Dense, SimpleRNN, LSTM, GRU, Dropout
from tensorflow.keras.callbacks import EarlyStopping, ModelCheckpoint


# 1. Data
x = np.array([[1,2,3],
              [2,3,4],
              [3,4,5],
              [4,5,6],
              [5,6,7],
              [6,7,8],
              [7,8,9],
              [8,9,10],
              [9,10,11],
              [10,11,12],
              [20,30,40],
              [30,40,50],
              [40,50,60]]) # (13, 3)
y = np.array([4,5,6,7,8,9,10,11,12,13,50,60,70]) # (13,)

x=x.reshape(13,3,1)
x_predict = np.array([50,60,70]).reshape(1,3,1)
# RNN, LSTM, GRU Model Input_dim: 3 -> reshape
# input_dim=1일 경우, reshape 생략이 가능하나 통일성을 위해 reshape 작성


# 2. Model Construction
model = Sequential()
model.add(LSTM(units=64,
               input_shape=(3,1),
               return_sequences='True'))
# input_shape(3,1): input_length=3, input_dim=1
# conv2D : input_dim 4 -> output_dim 4
# RNN, LSTM, GRU: input_dim=3 -> output_dim=2 / # (N,3,1) -> (N, 64)
# return_sequences = True: (None, 3, 64) input_dim만 units로 변화
model.add(SimpleRNN(units=64))
# model.add(GRU(units=64))
# ValueError: Input 0 of layer "lstm_1" is incompatible with the layer: expected ndim=3, found ndim=2. Full shape received: (None, 64)
# return sequence=True 처리 시, shape이 유지되므로 RNN Model 연이어 사용 가능
model.add(Dense(64, activation='relu'))
model.add(Dropout(0.2))
model.add(Dense(32, activation='relu'))
model.add(Dropout(0.1))
model.add(Dense(32, activation='relu'))
model.add(Dense(16))
model.add(Dense(1))
model.summary()


# 3. Compile and Training
model.compile(loss='mse', optimizer='adam')

earlyStopping = EarlyStopping(monitor='loss', mode='min', patience=32,
                              restore_best_weights=True,
                              verbose=1)

model.fit(x, y, epochs=512, callbacks=[earlyStopping], batch_size=1)


# 4. Evaluation and Prediction
loss = model.evaluate(x,y)
print("Loss: ", loss)

result = model.predict(x_predict)
print("Predict[50,60,70]: ", result)


'''
Result
Loss:  2.875849485397339
Predict[50,60,70]:  [[80.20353]]

'''
⭐ DNN, CNN, RNN data / input / output shape
| Model | Data | Input_shape(Data_shape-1) | Output_shape |
| DNN | 2차원 이상 | 1차원 | 2차원 이상(Data_shape 변형 X) |
| CNN | 4차원 | 3차원 | 4차원 |
| RNN | 3차원 | 2차원 | 3차원 |
소스 코드
참고 자료
📑 RNN(Recurrent Neural Network, 순환신경망)을 이해해보자
📑 i) LSTM
📑 keras
📹 [딥러닝] RNN 기초 (순환신경망 - Vanilla RNN)
📑 07-3. 순환 신경망 LSTM, GRU - (3)
'Naver Clould with BitCamp > Aartificial Intelligence' 카테고리의 다른 글
| [Warning] Allocation of ... exceeds 10% of free system memory (0) | 2023.01.29 |
|---|---|
| [Project] Stock price prediction using Ensemble model (1) | 2023.01.28 |
| CNN Model Construction2 (0) | 2023.01.26 |
| Save model and weights (0) | 2023.01.24 |
| CNN Model Construction (0) | 2023.01.24 |