public class Exam {
	private char[] ox=null;

	public void compare() {
		for(int i=0; i<JUNG.length(); i++) {
			if(dap.charAt(i)==JUNG.charAt(i)) {
				ox[i] = (char)'O';
			} else {ox[i] = (char)'X';}
		} // for
	} // compare
}
⭐ Exception in thread "main" java.lang.NullPointerException: Cannot store to char array because "this.ox" is null
→ NullPointerException 발생
Exception 원인
char[]를 선언 후, 배열의 크기를 지정해주는 초기화 작업을 진행하지 않음
해결 방법
public class Exam {
	private char[] ox=null;

	public void compare() {
    ox = new char[JUNG.length()];

		for(int i=0; i<JUNG.length(); i++) {
			if(dap.charAt(i)==JUNG.charAt(i)) {
				ox[i] = (char)'O';
			} else {ox[i] = (char)'X';}
		} // for
	} // compare
}

/*
Result
O	X	X	O	O
*/
[root@hj0216 ~]# rdate
-bash: rdate: command not found # uninstalled
[root@hj0216 ~]# gcc
-bash: rdate: command not found # uninstalled
[root@hj0216 ~]# javac
-bash: rdate: command not found # uninstalled
[root@hj0216 ~]# locate
-bash: rdate: command not found # uninstalled
3. Network Test
[root@hj0216 ~]# ping -c3 8.8.8.8
PING 8.8.8.8 (8.8.8.8) 56(84) bytes of data.
64 bytes from 8.8.8.8: icmp_seq=1 ttl=54 time=33.0 ms
64 bytes from 8.8.8.8: icmp_seq=2 ttl=54 time=31.4 ms
64 bytes from 8.8.8.8: icmp_seq=3 ttl=54 time=31.7 ms

--- 8.8.8.8 ping statistics ---
3 packets transmitted, 3 received, 0% packet loss, time 2003ms
rtt min/avg/max/mdev = 31.442/32.097/33.088/0.712 ms
4. ssh server connect
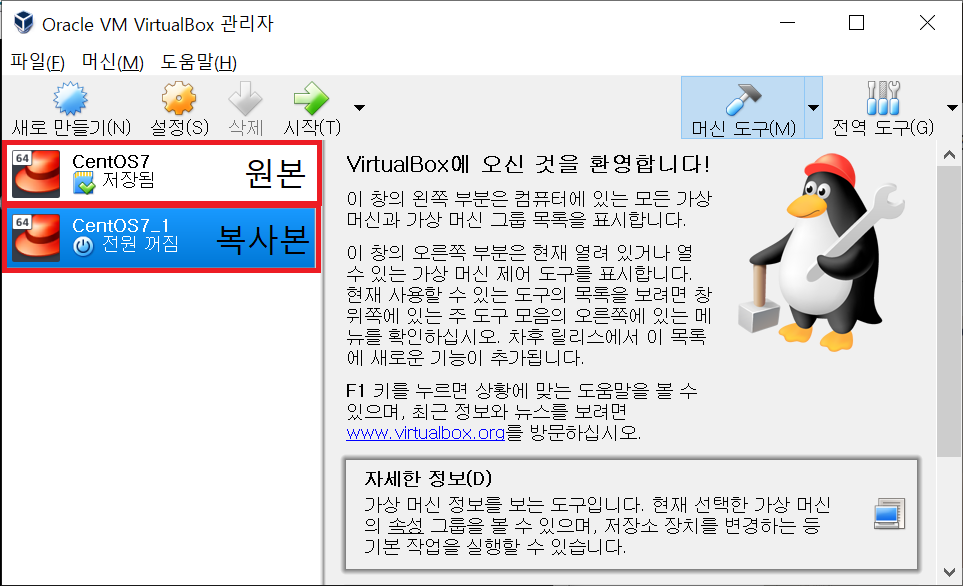
[root@hj0216 ~]# systemctl stop firewalld # 해당 session에서만 방화벽 끄기
[root@hj0216 ~]# systemctl disable firewalld # 모든 session에서 방화벽 끄기
[root@hj0216 ~]# systemctl start sshd # 해당 session에서만 ssh service 실행
[root@hj0216 ~]# systemctl enable sshd # 모든 session에서 ssh service 실행
[설정] -> [네트워크] -> [고급] -> [포트 포워딩]
포트 번호: 22, 80 추가
[파일] -> [환경설정] -> [입력] -> [가상머신] 호스트키 조합: F11 입력
(마우스 포인터를 리눅스에서 꺼내주는 역할)
PuTTY login
[root@hj0216 ~]# date
2023. 02. 05. (일) 14:18:32 KST
[root@hj0216 ~]# date -s "2000-12-12 21:30"
# 일자 및 시간 임의 지정
이미지를 학습시킬 때 학습 데이터 양이 적을 경우, 학습 데이터를 조금씩 변형시켜 학습 데이터 양을 늘리는 방법 중 하나
ImageDataGenerator Processing
1. ImageDataGenerator 객체 생성
: 이미지 파일들에 사용자가 설정한 여러가지 데이터 변형 기법을 적용함
train_datagen = ImageDataGenerator(
    rescale=1./255., # scaling
    horizontal_flip=True, # 수평 뒤집기
    vertical_flip=True, # 수직 뒤집기
    width_shift_range=0.1, # 가로 이동
    height_shift_range=0.1, # 세로 이동
    rotation_range=5,# 훈련 시, 과적합 문제를 해결하기 위해 shift, ratatoin 시행
    zoom_range=1.2, # 20% 확대
    shear_range=0.7, # 절삭
    fill_mode='nearest' # 이동 시, 발생하는 빈 칸을 어떻게 채울 것인가
)

test_datagen = ImageDataGenerator(
    rescale=1./255.
)
2. flow() / flow_from_directory() / flow_from_dataframe() 함수로 DirectoryIterator 객체 생성
xy_train = train_datagen.flow_from_directory(
    './_data/brain/train', # data path
    target_size=(200, 200), # data shape 통일
    batch_size=10,
    # total data: 160 -> batch_size=10: 160개를 10개씩 잘라서 훈련
    # 1 epoch 당 총 16번(iteration) 훈련 진행
    # dataset_scale check: batch_size를 높게 잡아 dataset scale 확인 가능
    class_mode='binary', # 폴더 라벨링 방식 지정: binary(0 1)
    color_mode='grayscale', # 색상: 흑백 / 컬러(rgb)
    shuffle='True', # parameter, 가장 마지막에 ','가 있어도 문제 X
    )
# Found 160 images belonging to 2 classes
# total 160장의 이미지가 2 classes(2 dir, folder)에 저장
print("Loss: ", loss[-1]) # list의 가장 마지막 값을 출력
print("Val_Loss: ", val_loss[-1])
print("Accuracy: ", accuracy[-1])
print("Val_acc: ", val_acc[-1])
'''
Result
Loss: 0.6932721734046936
Val_Loss: 0.6928479075431824
Accuracy: 0.5
Val_acc: 0.550000011920929
'''
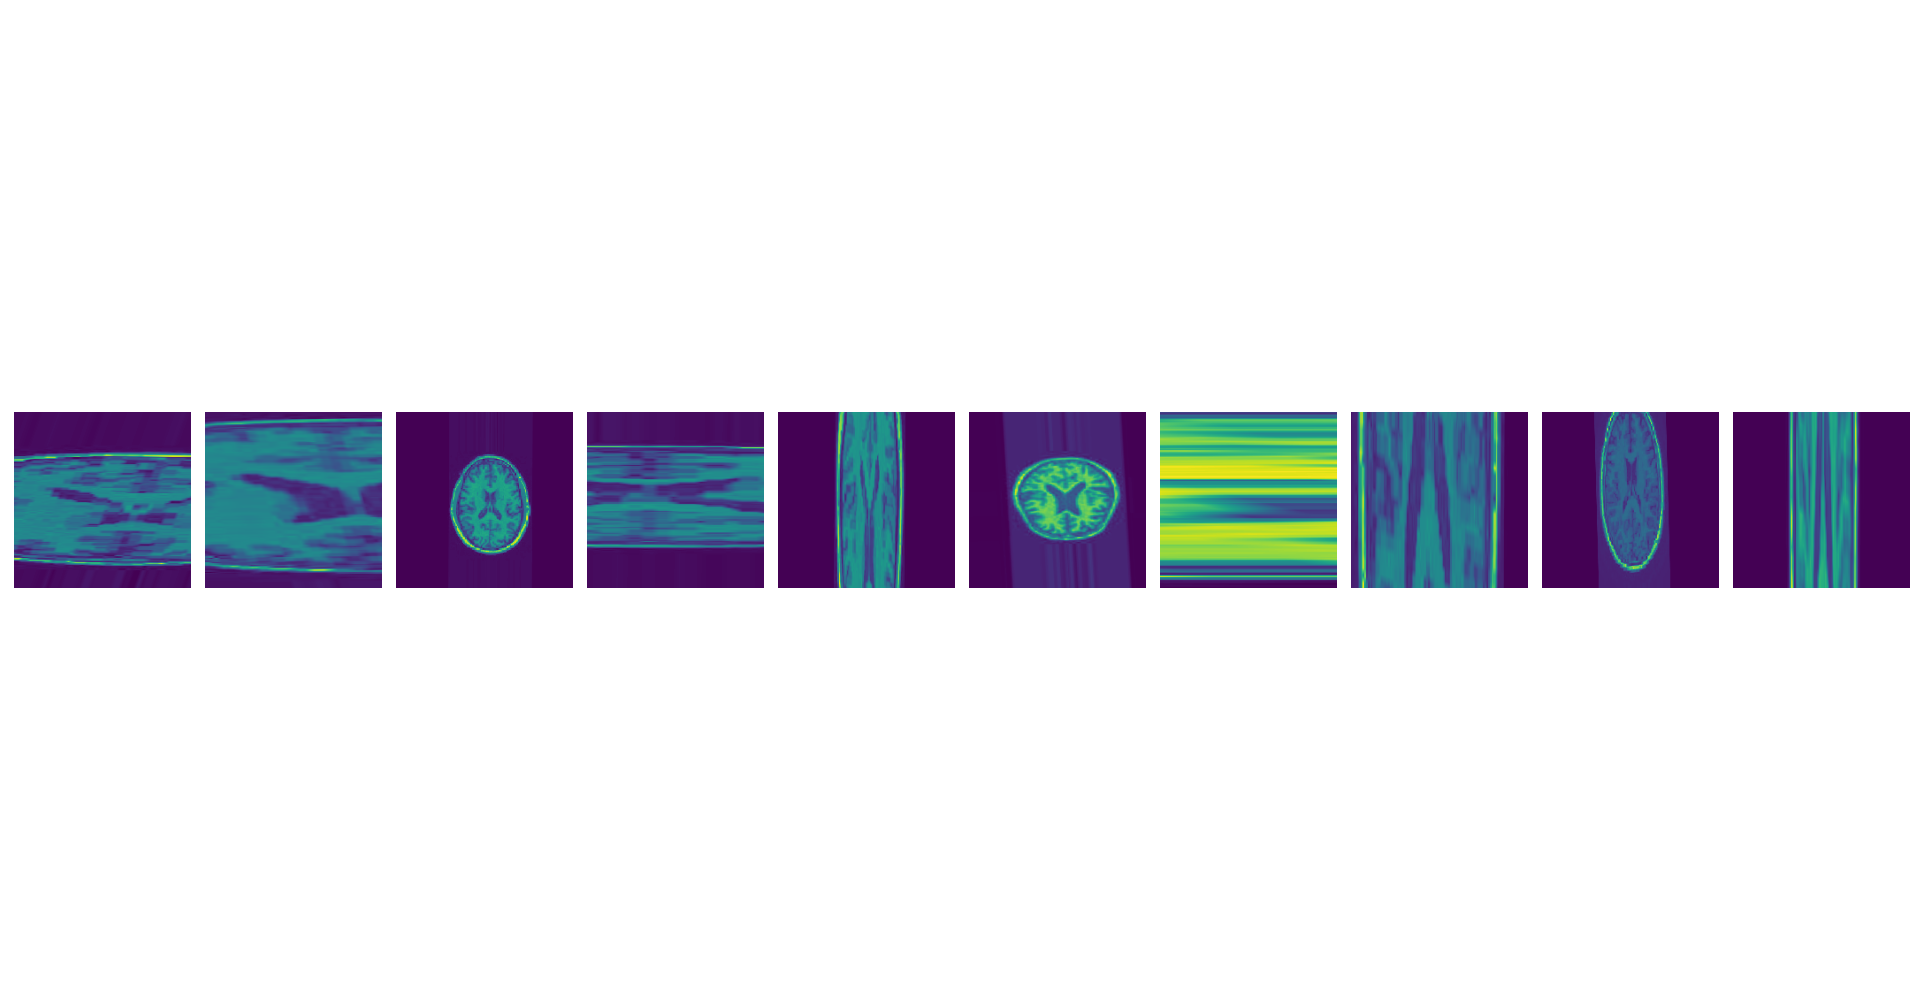
➕ ImageDataGenerator 출력(MatPlotLib)
import matplotlib.pyplot as plt
img = xy_train[0] # 1 batch(10개의 image set)을 img에 저장
plt.figure(figsize=(20, 10))
for i, img in enumerate(img[0]): # enumerate: (index, list_element)를 tuple type으로 반환
# enumerate(img[0][0])
# 루프가 반복될 때마다 변수 i는 현재 요소의 인덱스로 업데이트되고, img는 현재 요소의 값으로 업데이트 됨
plt.subplot(1, 10, i+1) # subplot(row, col, Index 지정: 1, 2, ...): 전체 이미지 내에 포함된 내부 이미지 개수
plt.axis('off')
plt.imshow(img.squeeze()) # 차원(axis) 중, size가 1 인것을 찾아 스칼라 값으로 바꿔 해당차원을 제거
plt.tight_layout()
plt.show()
⭐ 통합 Source Code
# imageDataGenerator.py
import numpy as np
from tensorflow.keras.preprocessing.image import ImageDataGenerator
# 1. Data
train_datagen = ImageDataGenerator(
rescale=1./255.,
horizontal_flip=True, # 수평 뒤집기
vertical_flip=True, # 수직 뒤집기
width_shift_range=0.1, # 가로 이동
height_shift_range=0.1, # 세로 이동
rotation_range=5,# 훈련 시, 과적합 문제를 해결하기 위해 shift, ratatoin 시행
zoom_range=1.2, # 20% 확대
shear_range=0.7, # 절삭
fill_mode='nearest' # 이동 시, 발생하는 빈 칸을 어떻게 채울 것인가
)
test_datagen = ImageDataGenerator(
rescale=1./255.
)
# test data: data preprocessing X
xy_train = train_datagen.flow_from_directory(
'./_data/brain/train', # data path
target_size=(200, 200), # data shape 통일
batch_size=10,
# total data: 160 -> batch_size=10: 160개를 10개씩 잘라서 훈련
# 1 epoch 당 총 16번(iteration) 훈련 진행
# dataset_scale check: batch_size를 높게 잡아 dataset scale 확인 가능
class_mode='binary', # 폴더 라벨링 방식 지정: binary(0 1)
color_mode='grayscale', # 색상: 흑백 / 컬러(rgb)
shuffle='True', # parameter, 가장 마지막에 ','가 있어도 문제 X
)
# Found 160 images belonging to 2 classes
# total 160장의 이미지가 2 classes(2 dir, folder)에 저장
xy_test = train_datagen.flow_from_directory(
'./_data/brain/test',
target_size=(200, 200),
batch_size=10,
class_mode='binary',
color_mode='grayscale',
shuffle='True',
)
# Found 120 images belonging to 2 classes.
# x,y가 dictionary(k, v) 형태로 들어가 있음
print(xy_train) # <keras.preprocessing.image.DirectoryIterator object at 0x000002134BCFCA60>
print(xy_train)
# <keras.preprocessing.image.DirectoryIterator object at 0x000002134BCFCA60>
# data type: tuple(x(numpy), y(numpy))의 집합
'''
print(xy_train[0])
(array([[[[0.08627451], [0.08627451], ..., [0.0858703 ], [0.08754121]],
...,
[[0.3088285 ], [0.22372028], ..., [0.17596895], [0.15582304]]]], dtype=float32),
array([1., 1., 0., 1., 1., 1., 1., 0., 1., 0.], dtype=float32))
total_data: 160
batch_size: 10
x0: xy_train[0][0], y0: xy_train[0][1]
x1: xy_train[1][0], y1: xy_train[1][1]
...
x15: xy_train[15][0], y15: xy_train[15][1]
'''
print(xy_train[0][0].shape) # data_x: (10, 200, 200, 1) = (batch_size, target_size_row, target_size_col, color)
print(xy_train[0][1].shape) # data_y: (10, ) = (batch_size,)
print(type(xy_train)) # <class 'keras.preprocessing.image.DirectoryIterator'>: tuple(x(numpy),y(numpy))의 집합
print(type(xy_train[0])) # <class 'tuple'> tuple(x(numpy),y(numpy)): 수정 불가능한 list
print(type(xy_train[0][0])) # x: <class 'numpy.ndarray'>
print(type(xy_train[0][1])) # y: <class 'numpy.ndarray'>
# 2. Model
from tensorflow.keras.models import Sequential
from tensorflow.keras.layers import Dense, Conv2D, Flatten
model = Sequential()
model.add(Conv2D(64,(2,2), input_shape=(200,200,1)))
model.add(Conv2D(64, (3,3), activation='relu'))
model.add(Conv2D(64, (3,3), activation='relu'))
model.add(Flatten())
model.add(Dense(16, activation='relu'))
model.add(Dense(16, activation='relu'))
model.add(Dense(1, activation='sigmoid'))
# model.add(Dense(2, activation='softmax')) # class_y: 0 1
# one_hot_encoding O: model.compile(loss='categorical_crossentropy', optimizer='adam', metrics=['acc'])
# one_hot_encoding X: model.compile(loss='sparse_categorical_crossentropy', optimizer='adam', metrics=['acc'])
# 3. Compile and Train
model.compile(loss='binary_crossentropy', optimizer='adam', metrics=['acc'])
hist = model.fit_generator(xy_train, steps_per_epoch=16, epochs=5,
validation_data=xy_test,
validation_steps=4)
# fit_generator: flow_from_directory(x, y, batch_size) 참조
# steps_per_epoch = total_data/batch_size
# validation_steps: validation_data/batch_size
accuracy = hist.history['acc']
val_acc = hist.history['val_acc']
loss = hist.history['loss']
val_loss = hist.history['val_loss']
'''
print("Loss: ", loss)
len(loss) = hist.fit(epochs)
변수 hist에서 epoch마다 loss를 list 형태로 저장
'''
print("Loss: ", loss[-1]) # list의 가장 마지막 값을 출력
print("Val_Loss: ", val_loss[-1])
print("Accuracy: ", accuracy[-1])
print("Val_acc: ", val_acc[-1])

'''
Result
Loss:  0.6932721734046936
Val_Loss:  0.6928479075431824
Accuracy:  0.5
Val_acc:  0.550000011920929

'''
import matplotlib.pyplot as plt
img = xy_train[0] # 1 batch(10개의 image set)을 img에 저장
plt.figure(figsize=(20, 10))
for i, img in enumerate(img[0]): # enumerate: (index, list_element)를 tuple type으로 반환
# enumerate(img[0][0])
# 루프가 반복될 때마다 변수 i는 현재 요소의 인덱스로 업데이트되고, img는 현재 요소의 값으로 업데이트 됨
plt.subplot(1, 10, i+1) # subplot(row, col, Index 지정: 1, 2, ...): 전체 이미지 내에 포함된 내부 이미지 개수
plt.axis('off')
plt.imshow(img.squeeze()) # 차원(axis) 중, size가 1 인것을 찾아 스칼라 값으로 바꿔 해당차원을 제거
'''
squeeze()
x3: array([[[0]],
[[1]],
[[2]],
[[3]],
[[4]],
[[5]]])
x3.shape: (6,1,1)
x3.squeeze()
array([0, 1, 2, 3, 4, 5])
'''
plt.tight_layout()
plt.show()