최근에 프로젝트를 진행하면서 ListView Control을 하며 어려웠던 부분을 정리하였습니다.
👉 기본 환경
- Language: C#, xaml
- IDE: Visual Basic 2022
Popup 태그를 처음 사용해보았는데, 간단하게 MVVM패턴에 맞춰
* Placement 컨트롤
* IsOpen 컨트롤
를 했던 방법을 정리해봅니다.
|
1
2
3
4
5
6
7
8
9
10
11
12
13
14
15
16
17
18
19
|
<StackPanel Grid.Column="2"
Orientation="Horizontal"
HorizontalAlignment="Center"
>
<TextBlock Name="statusTextBlock"
HorizontalAlignment="Right" VerticalAlignment="Center"
Text="Status: "
/>
<TextBlock Name="selectedStatus"
HorizontalAlignment="Right" VerticalAlignment="Center"
Text="{Binding SelectedStatus}"
/>
</StackPanel>
<Popup IsOpen="True" PlacementTarget="{Binding ElementName=selectedStatus}" Placement="Bottom">
<ListBox>
<ListBoxItem Content="🤓To Do"/>
<ListBoxItem Content="🤗Done"/>
</ListBox>
</Popup>
|
Popup 태그를 선언하고 팝업창에 보여줄 내용을 태그 안에 선언합니다.
먼저 위치를 확인하기 위해 Popup창의 open 상태(IsOpen)를 True로 설정해둡니다.
팝업창의 위치는 여러가지 방법으로 설정할 수 있는데,
저는 콤보박스처럼 보이기위해 SelectedStatus 밑에 위치를 시켰습니다.
위치의 기준이 되는 element에 name을 부여하고 PlacementTarget에 지정하고
PlacementTarget 기준으로 어디에 위치할지를 Placement에 선언합니다.
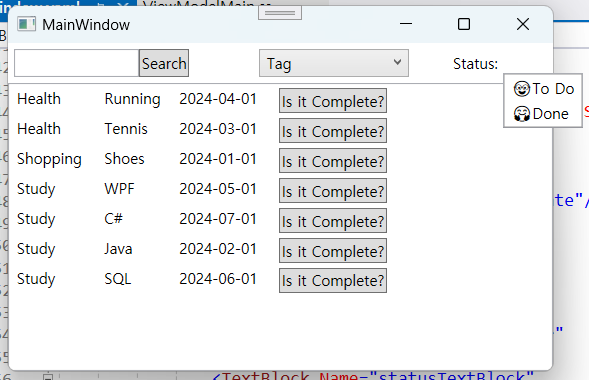
이런 모양새로 팝업창이 늘 나타납니다. 위치가 마음에 들지만.. 묘하게 창 안쪽으로 들어가줬으면 하는 마음에 위치를 조정해봅니다.
저는 SelectedStatus 자리에 값이 들어올 때, Status라는 TextBlock이 움직이는 게 싫어서 Width를 고정으로 입력하니 알맞은 위치에 들어가 따로 조정을 하지 않았지만,
Popup 태그의 Property로 수평은 HorizontalOffset, 수직은 VerticalOffset으로 추가적인 위치 조정이 가능합니다.
위치를 정했으니, Popup의 Open 상태를 컨트롤해야 합니다.
1. Popup 태그의 isOpen을 bool 타입 변수와 바인딩하고 초기값을 false로 설정합니다.
2. SelectedStatus 클릭 시에 isOpen값을 true로 변경하고
🫠 Textblock 클릭 컨트롤이라 behaviors nuget 패키지를 다운받았습니다.
3. ListBoxItem이 클릭되면 isOpen이 닫히고, SelectedStatus에 선택한 값이 들어오게 수정합니다.
🫠 한 김에 ListView도 같이 업데이트를 시켜보았습니다.
View
|
1
2
3
4
5
6
7
8
9
10
11
12
13
14
15
16
17
18
19
20
21
22
23
24
25
26
27
28
29
30
31
32
33
34
35
36
37
|
<StackPanel Grid.Column="2"
Orientation="Horizontal"
HorizontalAlignment="Center"
>
<TextBlock Name="statusTextBlock"
VerticalAlignment="Center"
Text="Status: "
/>
<TextBlock Name="selectedStatus"
VerticalAlignment="Center"
Text="{Binding SelectedStatus}"
Width="60"
>
<b:Interaction.Triggers>
<b:EventTrigger EventName="PreviewMouseLeftButtonDown">
<b:InvokeCommandAction Command="{Binding IsStatusPopupOpenCommand}" />
</b:EventTrigger>
</b:Interaction.Triggers>
</TextBlock>
</StackPanel>
<Popup IsOpen="{Binding IsStatusPopupOpen}"
PlacementTarget="{Binding ElementName=selectedStatus}" Placement="Bottom"
HorizontalOffset="0" VerticalOffset="5"
>
<ListBox SelectedValue="{Binding SelectedStatus, Mode=TwoWay}" SelectedValuePath="Content">
<b:Interaction.Triggers>
<b:EventTrigger EventName="SelectionChanged">
<b:InvokeCommandAction Command="{Binding ChangeSelectedStatusCommand}"
CommandParameter="{Binding SelectedItem.Content, RelativeSource={RelativeSource AncestorType={x:Type ListBox}}}"
/>
</b:EventTrigger>
</b:Interaction.Triggers>
<ListBoxItem Content="🐳All"/>
<ListBoxItem Content="🤓To Do"/>
<ListBoxItem Content="🤗Done"/>
</ListBox>
</Popup>
|
우선, TextBlock과 ListBox의 SelectedValue를 같은 변수에 바인딩을 해서 선택된 값이 TextBlock에 입력되게 하였습니다.
그리고 Textblock에 클릭 이벤트를 주고 싶어서 Behaviors를 사용했습니다.
그 다음, 팝업창은 열림 여부를 변수로 바인딩해주었습니다.
그 안의 ListBox에서는 SelectedValue로 선택된 값을 사용할 수 있게 변수와 바인딩하였고,
SelectionChanged 이벤트를 만들어서 팝업창을 닫고 ListView 아이템을 조건에 맞게 필터링하였습니다.
ViewModel
|
1
2
3
4
5
6
7
8
9
10
11
12
13
14
15
16
17
18
19
20
21
22
23
24
25
26
27
28
29
30
31
32
33
34
35
36
37
38
39
40
41
42
43
44
45
46
47
48
49
50
51
52
53
54
55
56
57
58
59
60
61
62
63
64
65
66
|
#region Properties
private bool _isStatusPopupOpen = false;
public bool IsStatusPopupOpen
{
get { return _isStatusPopupOpen; }
set
{
_isStatusPopupOpen = value;
OnPropertyChanged("IsStatusPopupOpen");
}
}
private string _selectedStatus = "🐳All";
public string SelectedStatus
{
get { return _selectedStatus; }
set
{
_selectedStatus = value;
OnPropertyChanged("SelectedStatus");
}
}
#endregion
#region Commands
private ICommand _isStatusPopupOpenCommand;
public ICommand IsStatusPopupOpenCommand => _isStatusPopupOpenCommand ?? new RelayCommand(IsStatusPopupOpenEvent);
private ICommand _changeSelectedStatusCommand;
public ICommand ChangeSelectedStatusCommand => _changeSelectedStatusCommand ?? new RelayCommand(ChangeSelectedStatusEvent);
#endregion
#region Commands
private void IsStatusPopupOpenEvent(object obj)
{
IsStatusPopupOpen = true;
}
private void ChangeSelectedStatusEvent(object selectedStatus)
{
IsStatusPopupOpen = false;
switch (selectedStatus)
{
case "🐳All":
ToDoList = new ObservableCollection<ToDoItem>(OriginalToDoList);
break;
case "🤓To Do":
ToDoList = new ObservableCollection<ToDoItem>(OriginalToDoList.Where(x => x.isComplete == false));
break;
case "🤗Done":
ToDoList = new ObservableCollection<ToDoItem>(OriginalToDoList.Where(x => x.isComplete == true));
break;
default:
return;
}
}
#endregion
|
⭐ 팝업창은 Popup 태그를 활용할 수 있다🔥.
📚 참고 자료
Microsoft.Xaml.Behaviors.Wpf를 사용하기 Part2
2023.02.06 - [WPF .NET] - Microsoft.Xaml.Behaviors.Wpf를 사용하기 Part1 Microsoft.Xaml.Behaviors.Wpf에서 가장 많이 사용되는 Action들에 대해서 알아보도록 하겠습니다. Action들은 Trigger를 이용해서 특정 작업을 쉽게
kaki104.tistory.com
'C# > WPF' 카테고리의 다른 글
| [WPF] Converter와 Visibility (0) | 2024.03.18 |
|---|---|
| [WPF] ResourceDictionary (0) | 2024.03.18 |
| [WPF] 검색과 정렬 (0) | 2024.03.10 |
| [WPF] ComboBox와 SelectedItem (0) | 2024.03.10 |
| [WPF] ListView와 SelectedItem (0) | 2024.03.10 |